In this post we are going to see how to show the financial dimensions as fields in a form grid, using a View that will retrieve the info from the table directly with Computed Columns. It is a fast way of getting the information to show it in the list and to be able to use the controls to filter by the dimension values.

Feel free to skip the first parts and go directly to the how to in the section Solution. I understand you don’t have neither time nor desire to read this long post… But if you do have the time, I wanted to give a little bit of context so I can share with you how I learn from the study of the standard and that the approach of understanding and looking for examples there it’s a lot worth the time.
Introduction
A requirement, I had to deal with some time ago, consisted of having the financial dimension values in a grid with the purpose of filtering by them (so display fields weren’t a choice). I am going to share with you the process and solution I had to go through to achieve this requirement the best way I could.
Preliminary Note
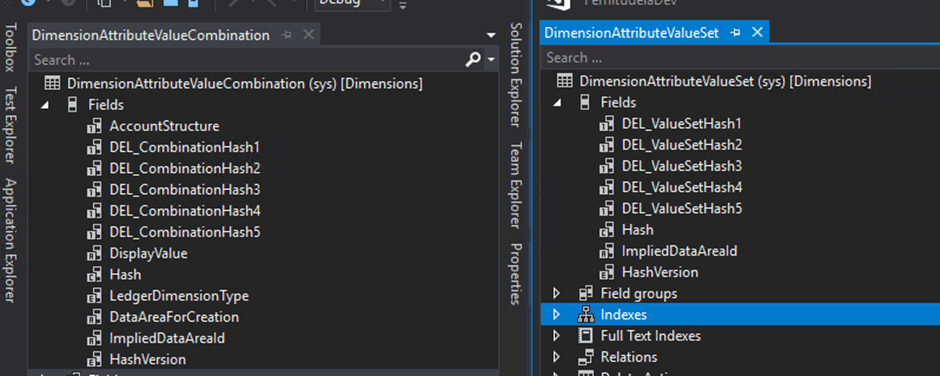
In this example that we are going to see, we will use the financial dimensions but everything is perfectly applied to ledger dimensions too, the only difference would be the tables from where we are going to get the data (DimensionAttributeValueSet for financial and DimensionAttributeValueCombination for ledger dimensions).
Quick overview of dimensions data model
Working with dimensions is a little complex in D365FO, at least at the beginning. They are normalized and generic (different implementations will have completely different dimensions) and so, they are not something easy and intuitive to work with. That’s why it is highly important to first understand the data model to be able to deal with them properly. Here we won’t see the dimensions in full details, but only the part that is related with our view; The combination of dimensions is stored in the DimensionAttributeValueSet (DimensionAttributeValueCombination for ledger dimensions). Exploring from VS, we will see that none of them has the information of the actual values of the dimensions, but they are stored in the DimensionAttributeValue.
For example, let’s say we want to know the dimensions cost center, department, and retail channel:

If we take a look to the tables
The values are not there… My first thought then was: how does the entity DimensionSetEntity (DimensionCombinationEntity for LedgerDimension), do to have the different dimensions as fields at combination level? The answer is: it uses computed columns.
And, what thing can use computed columns too and can be used for showing data in a grid? YES, the views!
Why do we need to use computed columns?
The answer to this question might be simple, but also unexpected if you didn’t know it already. The thing is, and due to the particularity of the dimensions, that in SQL we do have all the information that we need at DimensionAttributeValueSet (DimensionAttributeValueCombination), but it is not accessible through the table in VS.

The computed columns allow us to cast as a new column whatever we want, using direct SQL returned in a method. It is dangerous to use them, because you skip all the AX validations, but in our case, they will be very simple and safe. We are going to basically get straight the fields DepartmentValue, CostCenterValue and RetailChannelValue in our view as Computed Columns. This solution is very simple but also optimized and presents a really good performance. Let’s go together through the step by step.
Solution:
Here you are the thing you really wanted to see… The How To:
Step 1: Create the View
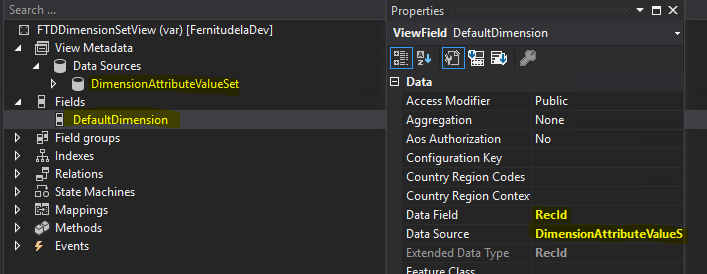
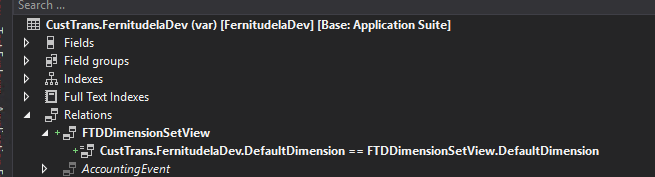
We create a new view (FTDDimensionSetView) with the DimensionAttributeValueSet as data source, and we add the RecId as a view field. Note that this RecId will be the DefaultDimension field in the table we want to show the dimensions from (CustTrans in this example), that’s why I named it DefaultDimension too in my view.
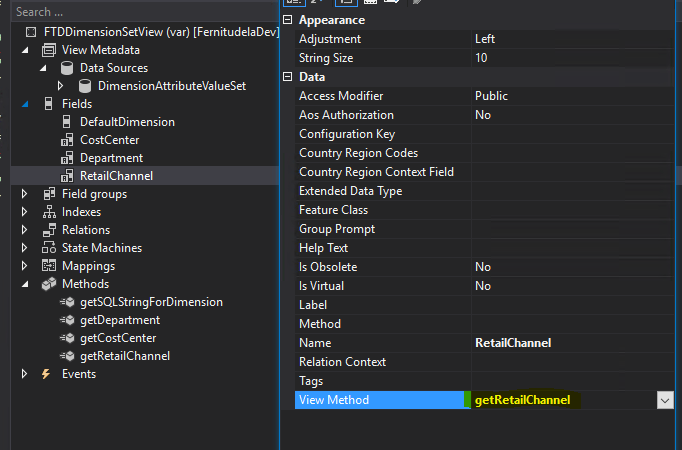
Step 2: Create the Computed Columns methods
We will use one static method per dimension value that we want to add to our view. The standard DimensionSetEntity entity needs to generalize it and uses only one complex method to load all the dimensions using an add-in once they are configured that create them automatically because every implementation has different dimensions… in our case, we don’t need that extra complexity because we already know and have the dimensions we want to show. KEEP IT SIMPLE!
Here you are the 3 methods (I decided to put the logic in a common method so there are 4 of them).
public class FTDDimensionSetView extends common
{
    private static str getSQLStringForDimension(DimensionRefFieldName _dimensionName)
    {
        DimensionAttribute dimensionAttribute = DimensionAttribute::findByName(_dimensionName);

        return dimensionAttribute.DimensionValueColumnName;
    }

    private static str getDepartment()
    {
        return FTDDimensionSetView::getSQLStringForDimension(FTDDimensionUtils::Department);
    }

    private static str getCostCenter()
    {
        return FTDDimensionSetView::getSQLStringForDimension(FTDDimensionUtils::CostCenter);
    }

    private static str getRetailChannel()
    {
        return FTDDimensionSetView::getSQLStringForDimension(FTDDimensionUtils::RetailChannel);
    }

}
In the methods, we are going to get the name of the columns in SQL (hidden from VS) from the table DimensionAttribute, where they are configured. (the Values in the FTDDimensionUtils class, are simply the values of Names field of this table).

Step 3: Create string computed columns
Now, we create the 3 new computed columns and associate them with the appropriate method created above using the property View method.

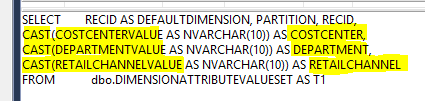
If, after synchronizing our view, we go to SQL and view the design of it, it can help us to visualize what the Computed Columns actually are:
Step 4: Add a new relation from the CustTrans
Now, we have to add a relation from the CustTrans to our View. This and the step number 5 (adding it to the form) are the only ones that you would need to do again in case you want to add the financial dimensions to any other table form. Therefore, as all the good developments, we’ve created a very useful, simple and reusable piece of code!
Step 5: Use it in your form
Add the new view to the form as a new related DataSource, add the fields to the grid…

ET VOILÀ! Note that we can filter by them! Requirement matched, Customer Happy, Ferni Happy.

I hope this post can help you, hurried developer, as much as it would have helped me if I had known it before.
And… What about the Dimension descriptions? Well… that’s a story for another post… 🙂

This is a great article – thank you! Curious, I saw your other post on Dimension Descriptions which leads to my question…….how would I get those into the view/grid so I can show the dimension and its description in the same grid?
LikeLike
you could either use the values using computed columns in a view like I did, and get the description with a display value, or create a computed column for the description too, using each of the dimAttr… views for that. Whatever it suits best your requirement
LikeLike
I got this error
Error Path: [AxView/CustomInvoiceView/Fields/FinancialDimension1/Method]:Method ‘getFinDim1’ does not exist on class ‘SysComputedColumn’.
Can you help me with this?
LikeLike
I would need to know more information about what you did! please provide the details.
LikeLike